

This easy recipe for individual sticky toffee puddings will be your new favorite to serve at your dinner party! Step-by-step photos help ensure you have success every time you make mini sticky toffee puddings!

So I used to work a British pub who was famous for their sticky toffee pudding, it was always the easiest upsell. I had it countless times, you know you accidentally pour cream on and realize that the customer wanted custard so whoops can't throw it away, I'll have to eat it! 😉
Their recipe was made with apricots, so no those of you that know where I worked this is not their recipe!
This is based on my Sticky Toffee Pudding Recipe, which I make in a 9-inch pan. This is for cute individual ones because individual desserts are always so much cuter!
Let's get to the recipe.

What ingredients are in sticky toffee pudding?
Many people are surprised when they find out that sticky toffee pudding is made with dates. I have seen and eaten version made with apricots, but I grew up with dates, so that is what I always stick with.
You will also need:
- Butter, at room temperature
- Granulated Sugar
- Large egg
- Vanilla Extract
- All-Purpose Flour/ Plain Flour
- Baking Soda
- Baking Powder
- Salt
Of course, we will also make a sticky toffee sauce.
- Light Brown sugar
- Unsalted butter
- Heavy Cream.
How do you make mini sticky toffee pudding?
To start let's soak the dates. Place the pitted dates in a large heatproof bowl and add boiling water. Let the dates soak for 10 minutes, this helps soften the dates and infuse the liquid with the gorgeous date flavor.
**Please note the process shots for this recipe where shot when I was making 8 sticky toffee puddings, but the recipe reflects 4, you can press the 2X button on the recipe card to see the recipe for 8 if you want**

While the dates are soaking, make the sticky toffee sauce. In a small pot over low-medium heat melt the butter and sugar together, whisking to combine. When the mixture is combined and all sugar is dissolved gently add 1 tablespoon of heavy cream at a time. Whisk so the cream is fully incorporated then add remaining cream, one tablespoon at a time.

After ten minutes add the dates, liquid, and add baking soda into a food processor and pulse 8-10 times until the mixture has broken down mostly- there will still be chunks that's what you want.

In a large bowl or bowl of your stand mixer add the softened butter and sugar, mix on medium speed for 2-4 minutes, until light and fluffy. Add the eggs and vanilla extract. Make sure to scrape the bowl so everything is combined, evenly.

In a separate bowl whisk together the flour, baking powder, and salt.

Gently fold the dry ingredients into the wet mixture, just until no large flour streaks remain. Add the date mixture with all the liquid.

I use these pudding cups and they are absolutely perfect! Pour 1 ½-2 tablespoons of toffee sauce in then spoon the sticky toffee pudding batter on top.
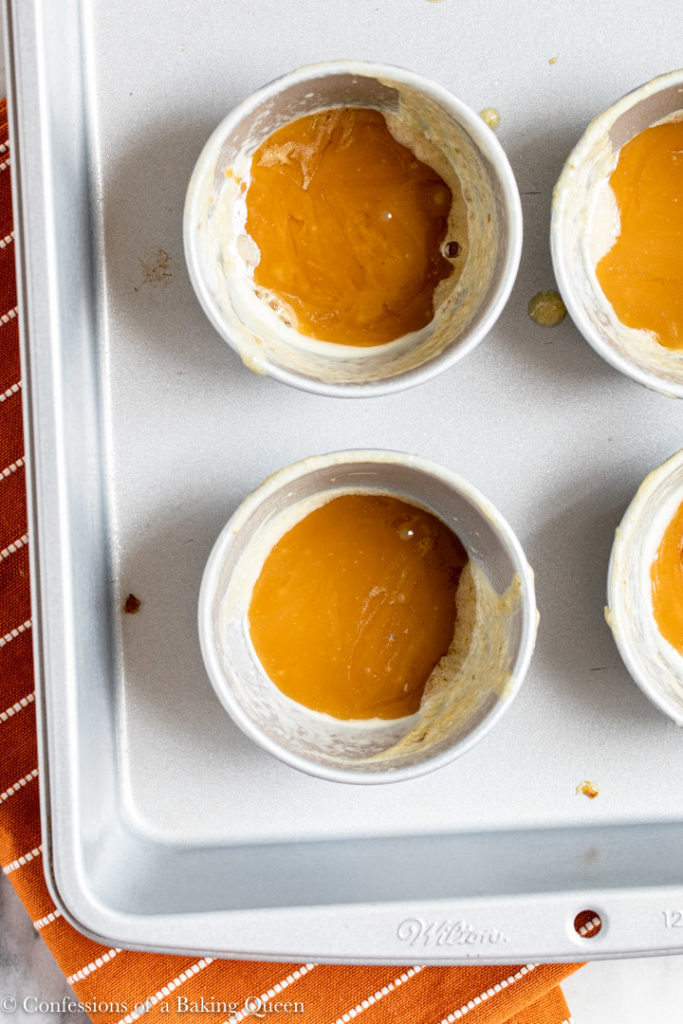

Place them in a 9X13 pan and pour hot water halfway up the sides. I find steaming the puddings in a water bath produces as more consistent bake. Wrap a piece of foil on top so that the puddings are completely covered- this will trap the steam.
Bake for 20-25 minutes, or until if you stick a toothpick in the center it comes out clean. Do not poke the toothpick all the way to the bottom!

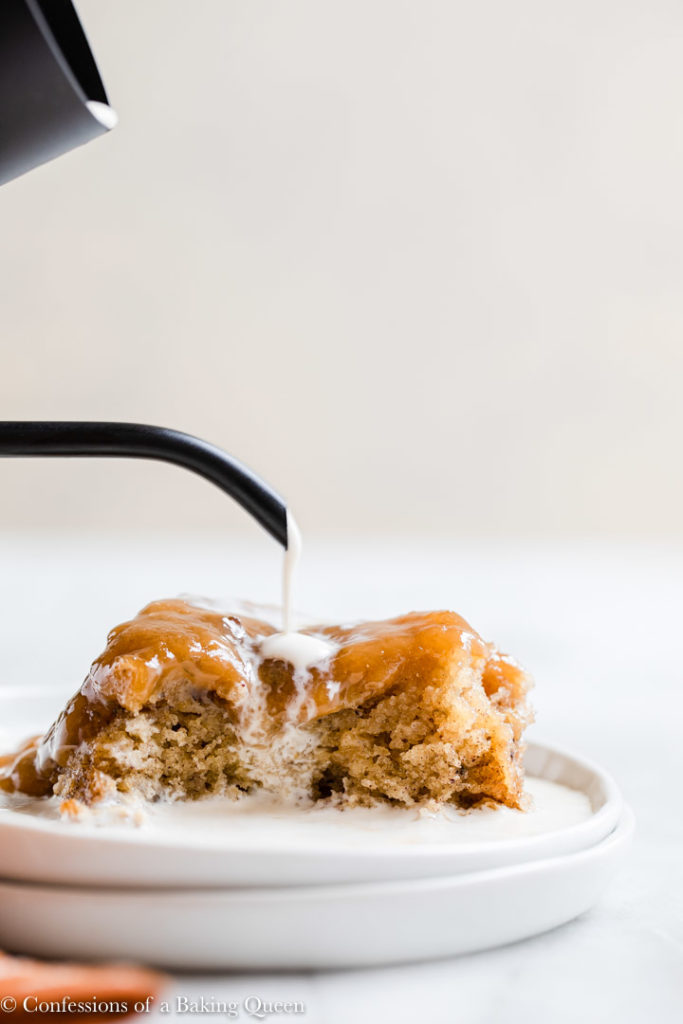
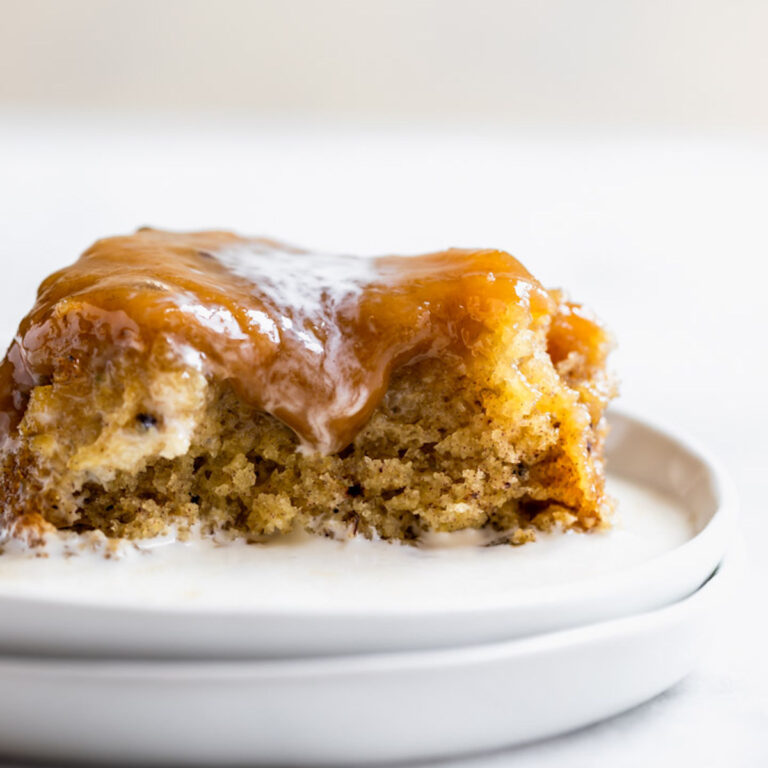
Carefully take the hot foil off and remove the puddings from the pan and let cool. I use an offset spatula/ angled spatula to gently release the pudding from the pan. Then place an upside down plate on top of the pudding and whack it right side up, the sticky toffee pudding should easily slide out of the pan.

Serve with heavy cream, ice cream, or Birds custard. Or make some homemade custard!
How long does homemade sticky toffee pudding last?
I wish I could give you a better answer, but they are always disappearing quickly at my house! You can definitely place the mini sticky toffee pudding cakes in an airtight container or cover in plastic wrap and keep it in the fridge for 3-4 days. You can reheat in the microwave for 30 seconds to a minute.
Can you make sticky toffee pudding ahead of time?
Totally, I will make them, de pot them and keep them in an airtight container in the refrigerator for up to 3 days then microwave or heat in the oven before serving.
Can sticky toffee pudding be frozen?
You can easily freeze the cake, then thaw either overnight in the fridge or let it cool on the counter for a few hours. Then heat up in the microwave or in the oven.
In the mood for more British treats?
- Mini English Sherry Trifles
- Salted Millionaires Shortbread
- Brown Butter Shortbread
- Coffee Layer Cake
- Bakewell Tart Recipe
★★★★★ Please let me know if you make this recipe by leaving a star rating and comment below!
Make sure to join our Newsletter and follow us on Pinterest, Instagram, Facebook, & Twitter.
PrintRecipe Card
Mini Sticky Toffee Puddings
This easy recipe for individual sticky toffee puddings will be your new favorite to serve at your dinner party! Step-by-step photos help ensure you have success every time you make mini sticky toffee puddings!
- Total Time: 45
- Yield: 4 Pots 1x
Ingredients
Cake
- 8 Pitted Dates
- 5oz (½ Cup + 2 Tablespoons) Boiling Hot Water
- 1 Teaspoons Baking Soda
- 1 ½oz (3 Tablespoons) Unsalted Butter, softened to room temp.
- 75 grams (⅓ Cup+ 1 Tablespoon) Granulated Sugar
- 1 Large Egg, at room temp
- 1 ½ Teaspoons Pure Vanilla Extract
- 63 grams (½ Cup) All-Purpose Flour
- 1 Teaspoons Baking Powder
- ⅛ Teaspoon Salt
Sticky Toffee Sauce
- 3oz (6 Tablespoons) Salted Butter
- 62 grams (⅓ Cup) Light Brown Sugar
- 2 Tablespoons Heavy Whipping Cream
Instructions
Cake
- In a large bowl add the dates and hot water, let sit for 10 minutes. Heavily grease ramekins, I use these pudding pots. Preheat the oven to 350F/180C. Prepare sticky toffee sauce while dates are soaking.
- In a food processor add the dates and liquid add baking soda and pulse 8-10 times until the mixture has broken down mostly- there will still be chunks that's what you want.
- In a large bowl or bowl of your stand mixer add the softened butter and sugar, mix on medium speed for 2-4 minutes, until light and fluffy. Add the egg and vanilla extract. Mixing to combine.
- In a small bowl whisk together the flour, baking powder, and salt.
- Gently fold the dry ingredients into the wet mixture, just until no large flour streaks remain. Add the date mixture with all the liquid. Place 1 ½-2 Tablesppons toffee sauce in each prepared ramekin then place pudding batter 75-80% up to the top. Place the ramekins in a 9X13 pan and pour boiling water halfway up the sides, then cover the pan with foil. Bake for 20- 25 minutes, until the cake, is done. You can check by lightly press the cake in the center if it bounces back the cake is done, or place a toothpick in the center of the cake to check for no wet batter. Let the cakes cool on a wire rack.
Sticky Toffee Sauce
- In a large pot add the butter and brown sugar. Whisk constantly over medium heat for 4-5 minutes. Add one tablespoon of cream at a time. Whisk each tablespoon of cream until its fully combined then add the next.
- To serve, use an offset spatula to loosen the puddings from the pots. Then place a plate on top of the pots- the top of the plate on the top of the sticky toffee pudding and hold it together then turn it upside down so the sticky toffee pudding releases on the plate to serve. Serve the pudding with heavy pouring cream, ice cream or Bird's custard.


Notes
**Please note the process shots for this recipe where shot when I was making 8 sticky toffee puddings, but the recipe reflects 4, you can press the 2X button on the recipe card to see the recipe for 8 if you want**
- Prep Time: 20
- Cook Time: 25
- Category: Dessert
- Method: Bake
- Cuisine: English

Carry-Anne says
Wow, I thought my local pub did great sticky toffees.... BOY WAS I WRONG. These are fantabulous!
Wendelyn says
I don't have pudding cups or ramekins. Can I use a muffin tin instead, that can fit 2oz? If so, do I have to change anything with the recipe or cooking time?
Elizabeth Waterson says
Hi Wendelyn, I personally have never used a muffin tin but my best guess would be to grease the muffin tin well and bake for 14-18 minutes, maybe a little longer just until the center is just firm. Please let me know if I can help with anything else or if you try the recipe! XX Liz
Julia says
I made these as a treat for a friend who'd been in hospital. Wow wee. DELICIOUS. Thank-you! I made a teeny variation to your great recipe by soaking the dates in earl grey tea. Thanks again for a lovely recipe.
Elizabeth Waterson says
So pleased you enjoyed the recipe, Julia! Thank you so much for coming back to leave a star rating and review I truly appreciate it! Soaking the dates in Earl Grey sounds delicious, I can't wait to try it!!! XX Liz
Cynthia Hall says
Would using ceramic custard cups change the baking time?
Elizabeth Waterson says
Hi Cynthia, the ceramic will be a little slower to heat but hold the heat longer. My only thought would be that the top might brown too quickly in that case I would tent the tops with a piece of parchment paper or lightly greased foil. Please let me know if you have any other questions or if you try the recipe I would love to know what you think! XX Liz
Nikki says
I did a test run of these this weekend. Followed the directions exactly except used the wee "mini cupcake" baking tin (Wilton) to make 24 bite sized, well, two bites for most, puddings. I just reduced the baking time to 17 mins and they were brilliant. Will be entering them in my work's Great British Bakeoff this week. Thank you for such a fab recipe!
Kounain says
This was perfect,though my pudding batter curdled a bit the baked outcome was perfect..I used cupcake moulds for baking
Elizabeth Waterson says
So glad you enjoyed the recipe Kounain, I appreciate you coming back to review it! XX Liz
Stephen Perry says
Shocking recipe. Mixture really wet, took over 30 minutes, 2 cooked and 2 still wet( raw)
As a former chef and practical cookery teacher, I would/ could not recommend it
Elizabeth Waterson says
Hi Stephen, sorry for the delay your comment ended up in my junk folder. I am so sorry you had trouble with the recipe. I actually just made this recipe and didn't have that issue at all. I wonder if your oven might have some hot spots and is not heating properly. Sorry, you didn't enjoy it. xX Liz